| Free Shipping on All Domestic Orders Over $100! | ||||||||
Hand Forged Wood Carving Knives Since 1987 |
| |||||||
| ||||||||
|
|
| |||||||||||||||||
|
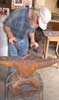
Below are some pictures of a past workshop | |||||||||||
| more pictures | |||||||||||
| |||||||||||
| The information below is from a class I held several years ago. The handout gave a lot of very good information. I offer it here, in the hopes it may be valuble to others. |
Small Chisel & Gouge Making ClassClass DescriptionThis class will be making fine chisels and gouges for wood sculpting. Although handles will be discussed, they will not be made during the class. The focus will be on the blades - choice of steel, forging, shaping, beveling, heat treating, and final sharpening. Students will each complete numerous blades during the class.
 some of the chisels and gouges made as part of the previous workshop
|
| Below is the handout that was given out to the class. It is provided here to help potential participants decide whether they may want to sign up. Much material will be very difficult to follow by anyone who has not taken the class. A lot of explaining is needed along the way. It is certainly not intended as a "stand alone". |
Ramblings on Small Chisel & Gouge Making(handout for class by Jim Wester of www.northbayforge.comheld at Meridian Forge January 14, 2006) |
The ability to make your own tools is very empowering. Designs are only limited by your imagination.
I hope what follows helps bring you along that path.
Participants please bring:
General comments on forgingW-1 is simple, plain, high carbon steel. Thus it is easy to heat treat and very forgiving in regards to forging temperature on the low end. Be careful to avoid overheating, however, as you don't want grain growth. Based on my own testing and comments from customers over the past 18 years, I believe W1 is the best for holding a fine edge. In my experience the complex, highly alloyed steels will not take the fine edge that plain, high carbon steel will.I like to use the smallest stock I can for a given tool, leaving some of the scale and forging marks in non-critical areas. A lot of steel won't be unnecessarily removed, and the blade will end up almost as thick as it was forged. This way, grinding and scratch removal are kept to a minimum. Clean forging also results in a tool that will require the least grinding. Basically, try to forge the tool so that the only grinding will be near the edge. Don't worry about the bevel itself too much because that will be ground anyway. (Are you getting the idea I don't care for grinding?) Best to decide the details of the tool design before getting the steel hot; maybe even write them down so you won't forget. If the design is at all complex, decide the sequence of steps and write them down too. In general, plan to forge the major changes in cross section first (transition from tang to blade, etc.). Gradually refine the blade area later, the bevel last. "Half face blows" are very effective for forging shoulder area. During forging, the amount of spreading (width wise) depends a great deal on the tools used (shape of dies or hammer,) but generally figure on spreading to a maximum of twice the diameter of the parent stock. You can get a lot more than that with some upsetting. Fishtail design works out well for forging. The blade gradually tapers in thickness as it widens, thus requiring very little change in actual cross sectional area.
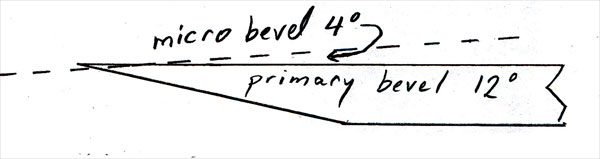
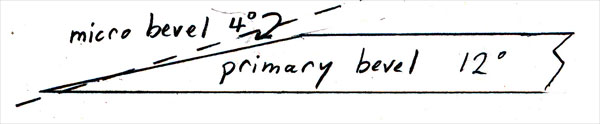
General comments on bevelsProbably the most important consideration in the design of an edge tool is its bevel - what kind it is, where it is, how fine it is. There are several different kinds: hollow, rounded, straight, or fine primary bevel with secondary micro bevel. I almost always use the last one, and it is the focus for today's class.These are the reasons I use the fine primary bevel with secondary micro bevel:1. It cuts extremely well because the blade is so thin.2. There is still adequate support behind the edge to provide for good edge holding, because of the micro bevel. 3. It makes for a lighter, more delicate tool. 4. Re-sharpening and stropping are fast and easy because very little steel is removed. You must decide whether the bevel will be on the "top" or "bottom" of the blade. The bottom of the blade is the surface that will be in contact with the wood when in use. The convex side is the bottom of all gouges. The micro bevel will almost always be on the top side of both chisels and gouges. Carpenter's chisels and gouges have their primary bevel on the top (concave) side, and a very flat bottom. Carver's chisels and gouges have their bevels on the bottom.
 Above: Carpenter's chisel or gouge has flat bottom, primary and micro bevel on top.
The focus for this class is supposed to be carver's tools. This is partly because carpenter's tools need to have their "flat" side very flat. That adds another level of difficulty I wanted to avoid for this one day class. The grinding is much easier for carver's tools because the "flat" side doesn't need to be very flat. Bent knives and scorps are even more difficult (for different reasons.) However, you are welcome to make whatever you want--I'll try to help as I can. We have some 1/4" mild steel to use for practice. You might want to forge a few blades with that first (save them for practice grinding later), then move onto the W1. It's up to you--whatever you are comfortable with. It is difficult to specify exact grits (especially to start with.) There are a lot of factors that have an effect. So the grit numbers I give are only guidelines. These are the tools I thought I would make today. All of them are beveled on the bottom.1. 1/4 inch straight chisel with straight edge, from 3/16 round W12. 1/2 inch fishtail chisel with straight edge, from 1/4 round W1 3. 1/2 inch barely bent fishtail gouge with round edge, from 1/4 round W1 4. 1/2 inch gouge with about 5/8 inch diameter sweep, with round edge, from 3/8 round W1 (Are there any other specific requests?) During the class I will finish one tool with an extra fine primary bevel of about 8 degrees and micro bevel of 4 degrees. At the end of the day, we will test this by carving across the end grain of Red and Yellow Cedar to show the ultimate ease of carving and smooth finish. Then we will use it to aggressively carve across the end grain of Honey Locust to show that it won't hold up to that (the edge will fail.) This is to demonstrate how important it is to decide a tool's use and design the bevel accordingly. Process (50 steps to a great tool)The details given below are for chisels and gouges with the primary bevel on the bottom (carver's tools.) The process would be different for chisels and gouges with primary bevel on the top (carpenter's tools.)We will primarily be using power belt sanders for all grinding prior to heat treating, and non powered hand sharpening equipment after heat treatment. However, feel free to try using what seems best.
1. Forge blade flat (no cupping or bending until after the initial grinding is done.) Forge 12 degree bevel last. Calipers can
be used to check for uniform thickness, and bevel gauge to check forged primary bevel. For most (all?) of these tools,
the bevel will be on the side opposite the shoulder. This means the blade will be held on the anvil with the shoulder
side down for forging both the shoulder and the bevel. 2. Second to last heat (low heat) is for final straightening. 3. Last heat is to anneal. Don't get it too hot. 4. Acid dip if possible to remove the scale which is very abrasion resistant. With new battery acid, used full strength, this will take about 20 minutes. Rinse in plenty of water. Prior to heat treating: Don't worry about overheating while grinding, and don't quench to cool while grinding before heat treatment. 5. Grind the profile (using about 120 grit.) 6. Grind the flat side to remove the scaling and pitting you think is necessary (about 60 grit.) It doesn't need to be "dead flat" because these are not carpenter's tools. 7. Proceed with scratch removal on flat side to whatever degree you want. (240 or even 120 grit is sufficient.) 8. Grind the bevel to 12 degrees, leaving the edge about the thickness of a credit card (about 60 grit.) A deeply cupped gouge should be left about twice as thick on the edge to help avoid the wrinkling problem you can see in some of my samples. 9. Proceed with scratch removal on beveled side to about 320 grit. 10. Refine profile as needed during steps 6 through 9. The idea is to get a constant bevel of 12 degrees along entire blade while maintaining the edge along the entire length to be a uniform thickness of about a credit card. 11. Cupping and bending the gouges are done now. Control of heat is important. Try to avoid overheating the edge. Small parts are hard because they lose their heat so fast. Gouges resist taking a fair, continuous cup. They cup first and most in the middle. Be aware of that and try to compensate for it. 12. To harden, bring heat up slowly, away from edge. Check with magnet (W1 is very reliable here.) Train your eye to see the "shadow" as steel goes through transformation. Scale will generally pop off during hardening only where the steel was hot enough to harden. 13. Lightly sand surface to shiny metal to show tempering colors. Temper at 400 to 450 degrees F. (depending on the tool and how it is intended to be used) for 2 hours minimum (medium straw.)
14. Second temper should be 25 to 50 degrees below first temper. This can be short (15 minutes.) 15. Quickly sand or buff both sides so metal is shiny enough that you'll be able to see tempering colors if you overheat the edge on either side while sharpening. 16. Grind the bevel side to the contour you want, probably starting with the same grit you ended with before heat treatment. This may include a little bit of rounding if the tool is to be used for scooping out hollow areas (like spoons) or if it is an adze blade. Usually, however, the bevel will want to be quite flat. In any case, be careful to avoid any rounding of the edge. Continue grinding, removing scratches to about 600 grit. Be careful to maintain the profile (redress if needed) and to keep the entire edge about half the thickness of a credit card. 17. The scratch marks left on the flat side (concave for gouges) are cosmetic. Remove them if you like. 18. Now for the micro-bevel. Draw the burr on the top side of the blade with about 220 grit, by raising the sharpening angle about 4 degrees above 12 (about 16 degrees total.) If using sandpaper, make sure to avoid moving the edge into the sandpaper. Stroke with the edge moving away from the sandpaper instead. You should raise a continuous burr along the entire length of the edge. The micro bevel should be about the same depth (1/8 inch or so) throughout the length of the edge. 19. Remove the grinding marks on the micro-bevel while maintaining the same bevel angle. Continue grinding down to about 600 grit. 20. You should be able to go from 600 grit to the hard backed leather strop with rouge at a slightly greater angle, but avoid rounding over the edge. 21-40. PROTECT FROM RUSTING AND CONTACTING OTHER METAL! 41-50. STROP OFTEN! One of the best indicators of how much sharpening a person has done is how careful they are with their tools when not using them. A simple towel makes a remarkably good tool roll. (Make sure it is dry!)
This class is respectfully dedicated to Ike Bay, without whose perseverance and help it never would have happened! |
|
My carving knives are intended for serious wood carvers. They are razor sharp and can be very dangerous if used improperly. Please be careful and don't allow young people to use them unsupervised. Your satisfaction is fully guaranteed. If you have a problem of any kind with one of my knives, please let me know. I will make it right with you. |
|
|